It is surprising how few insurance agencies have adopted SEO as a lead generation strategy for their business.
For those of you who are investing in SEO for your insurance agency, pat yourself on the back.
You are a step ahead of your competitors.
And today you are going to get 16 more steps ahead using our process to improve SEO for insurance agencies.
Now keep in mind, there are SO MANY MORE than 16 steps to doing complete SEO for an insurance website.
SEO is a complex process involving optimizing over 200 fluctuating search engine ranking factors that requires an ongoing approach.
Today I’m going to share the most important, quickest, and lowest hanging fruit when doing SEO for insurance agents.
That said, some of these steps are technical and may require help from a professional SEO or web developer.
1. Premium Hosting
2. SSL (https)
3. Keyword Research
4. Create Content
5. Setup Analytics
6. Analytics Review
7. Setup WMT
8. Submit Sitemap
9. Audit Website
10. Page/Meta Titles
11. Meta Descriptions
12. Page Headers
13. Internal Links
14. Citations
15. Earning Links
16. Ongoing Reviews
Leadsurance clients don’t need to worry, all of this and more SEO is done-for-you as a part of all of our packages.
🚀 SEO for Insurance Agents
1.) Get Premium Web Hosting
If there is one insurance SEO tip you take action on, let it be premium web hosting.
A good analogy here would be the biblical story of the wise man who built his home on rock and the foolish man who built his home on sand, known as “Wise and Foolish Builders” or “House on the rock”.
Don’t let your site get washed away online like the house on sand.
Build a secure presence that will last like the man using a rock-solid foundation.
Invest in premium hosting so that your site is accessible, fast, and never gets overloaded with traffic, hacked or overloaded with spam.
All of which would reduce traffic or even take your site offline with low-quality hosting.
Offering your insurance clients a fast experience that is always accessible and never “offline” is the backbone of your digital marketing and client service offering.
That alone should convince you to invest in great hosting infrastructure, but if that isn’t enough then know that simply investing in better hosting will improve your SEO.
Google places high importance on quality hosting is which is why site speed, performance, and other hosting factors are taken into high consideration in Google’s ranking algorithm.
So, the lowest hanging fruit to improve your insurance agency’s SEO very well may be investing in better hosting.
At Leadsurance we partnered with WPEngine to provide our clients with hosting that is most trusted in the industry as well as the highest performing. Leadsurance clients also receive free SSL certificates and migration service from http to https.
2.) Buy & Setup an SSL Certificate
SSL stands for Secure Sockets Layer.
It means your website will be accessible at https://yourwebsite.com instead of http://yourwebsite.com
Notice the ‘s’ in the first example, this stands for “secure”.
This added layer of security is a Google Ranking Factor.
By having it, your visitor’s have a more secure experience on your website which makes Google trust your site more. This leads to higher rankings and more traffic from Google.
Also, your website visitors will notice the added security and appreciate it.
This means more people will stay on and use your site as opposed to leaving or “bouncing”.
By increasing visitor interaction with your site, you will be sending another good signal to Google.
Google will then also reward your improved visitor interaction by increasing your rankings again.
Nice. Two birds with one stone!
Additionally, you can expect more of your website visitors to convert into leads. Like Google, they will also trust your secure site more than unsecured competing sites.
Recently Google has begun displaying in the Chrome browser a message stating whether or not the websites you visit are secure.
So, it is becoming even more important to add SSL to your site.
The old idea many business owners hold onto, that only e-commerce stores need SSL, simply isn’t true.
SEO for insurance agents requires SSL as well.
Google knows how important quality hosting and SSL security are in today’s world.
3.) Use Ubersuggest Keyword Tool for Research
Analyze what your buyers are searching online so you know which keywords you should target.
You can use free tools like Ubersuggest to do this.
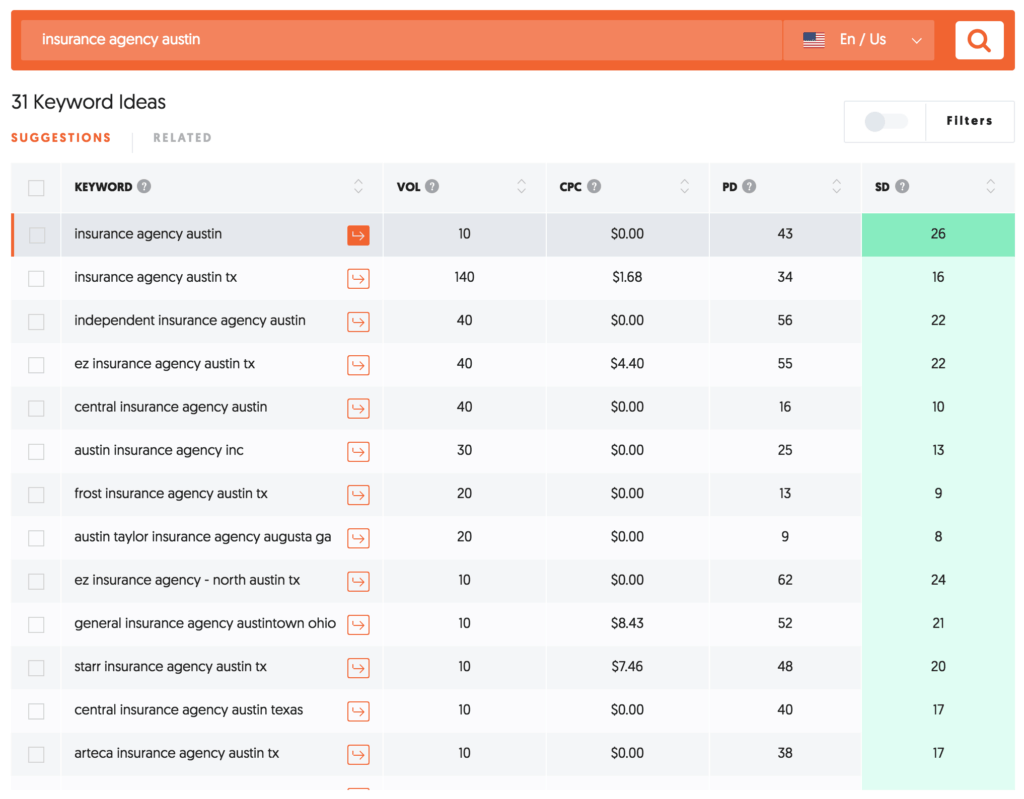
You can type in 1 keyword like “what type of life insurance do I need” or “insurance agency austin”.
The tool will give you dozens, sometimes hundreds, of related keyword searches and show you how much search volume each one gets.
This information will help you know which keywords you want to target and rank for in search results.
Make sure to be choosing keywords that get at least 10 searches per month, have low or medium competition, and are a keyword relevant to your buyer.

Tips to Perform Keyword Research with Ubersuggest:
Go to Ubersuggest
Enter your main keyword
Click the button that says “search”
A list of keywords will load with some helpful data for you to analyze, such as search volume, top competitors ranking for the keyword, and a proprietary difficulty score.
The foundation of every SEO campaign is its targeted keywords.
You must first discover what your market is searching and then create an SEO strategy to gain visibility for your target keywords.
Find keywords with the highest search volume and lowest difficulty score. These are the least competitive/best opportunities you have.
Of course, you want to be choosing terms that have buyer intent, or keywords that you know your customers are searching when looking to buy.
- One important keyword category to focus on are local or nearby types of searches such as, “insurance agent near me” or “insurance agent in los angeles”.
- The next most important category would consist of research questions your potential clients would search such as, “term vs whole life insurance”.
Once you have a list of your target keywords you can begin optimizing your website and online business listings to ensure you rank for those terms.
With your keyword list in hand, you can tackle the next tips, so keep reading to learn the most important on-page SEO factors that you should optimize.
We also put together an in-depth guide to finding insurance keywords + a list of the top 126 life insurance keywords.
Leadsurance clients benefit from having professional keyword research done-for-you by experienced SEO consultants using premium tools providing superior data to free tools like ubersuggest. Additionally, we create branded and SEO optimized content for you on a monthly basis and report on the search traffic and keyword rankings.
4.) Create & Optimize Content
When doing SEO for insurance agents, it will be important to create high quality and optimized content.
Once you have finished your keyword research and you have a list of your target keywords it is time to create content around these topics.
Review your website and make sure you have information covering these topics in detail. Content that is too short or “thin” according to Google doesn’t rank well.
Review all of your content and see if you can simply edit or add content to existing pages to be optimized for your keywords.
When optimizing a page, make sure that you have your keyword in the Page & Meta Titles, Meta Description, Page Headers, and Internal Links.
(Click to skip down to sections covering each factor)
You also want to use the keyword naturally throughout the page while providing valuable content answering the searcher’s query.
Only include your keywords and related keywords, where they make sense, throughout your content.
Be careful not to “stuff keywords” or overuse your keywords to the point where they sound unnatural.
Google will read your keyword density, and if it determines that you are over optimizing your page for a keyword, you can be penalized.
Make sure to not over-optimize your webpages or your online profiles.
As mentioned, incorporating your keyword is crucial but it needs to read naturally to users as well as not signal a flag to search engines that you are “keyword stuffing” in your content, as this will merit for a penalty. A penalty can result in de-indexing your website from search engines eliminating your search traffic. Be careful, writing good SEO copy is an art and a technical skill.
If you don’t have existing pages to optimize, then blog articles are a great way to answer your buyers’ questions.
Try to write at least one article about each keyword topic that you select from your research.
There are many SEO tools to help you create optimized content, this beginners guide to SEO software will help you find the right ones for your workflow.
Next, we are going to talk about Google Analytics and how you can set up tracking to see how your website performs in Google.
5.) Setup Google Analytics

The first thing that you should do when launching a website is install Google Analytics tracking software.
It is free, takes a couple minutes to set up, and will be one of the, if not THE, best sources of information to optimize your website.
Google Analytics will track where all of your traffic comes from whether that be a social media site, a search engine, or another website. Google Analytics tracks tons of user and behavior data as well such as the city the user is from and which pages they visit on your site and for how long.
In future tutorials, we will share how to use this data, like how to create custom reports with this data, as well as how to set up and track goals on your website so you can optimize your conversion rate.
But today, we will just do a quick Google analytics setup guide to get you started with Google Analytics.
Leadsurance clients who already have Google Analytics accounts only need to add us as a user, then our team will integrate your analytics account when we onboard your insurance agency onto the Leadsurance platform.
Steps to Install Google Analytics
First, go to: analytics.google.com and sign into your Google Account, or click on “create account”.
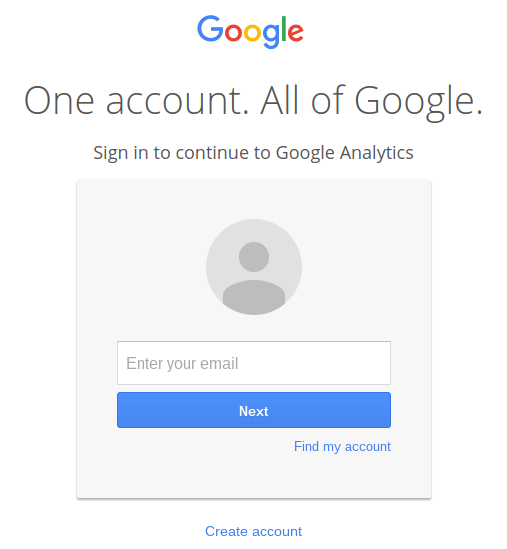
Now that you have created and/or logged in to your account it is time to set up your website property in Google Analytics.
Click on the ‘Admin’ tab on the top horizontal menu.

Three columns will appear, the first column is titled ‘Account’.
Select ‘Create new account’ from the drop down under ‘Account’.
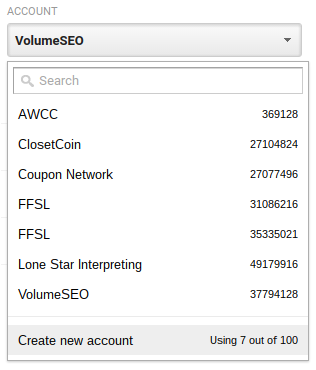
Note: If this is your first time setting up a Google Analytics account, then you won’t see a list of accounts like in the screenshot from my Google Analytics account.
You will be taken to this form to fill in your account details:
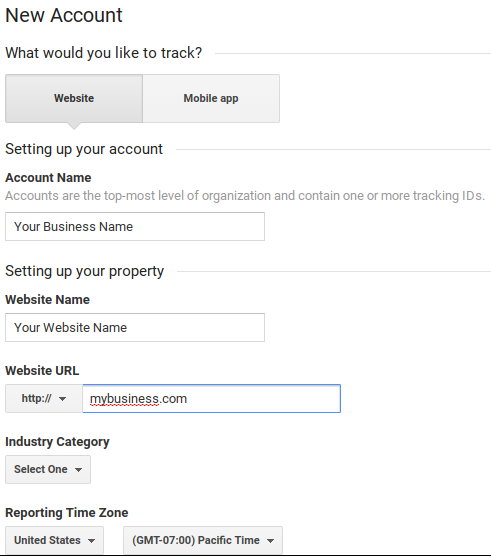
Fill in each of the fields in the screenshot above, for now, skip the checkboxes you see after filling in these fields.
Scroll all the way down to the bottom and click the button that says, “Get Tracking ID”.
![]()
Then a pop-up window will appear, accept Google Analytics Terms of Service Agreement.
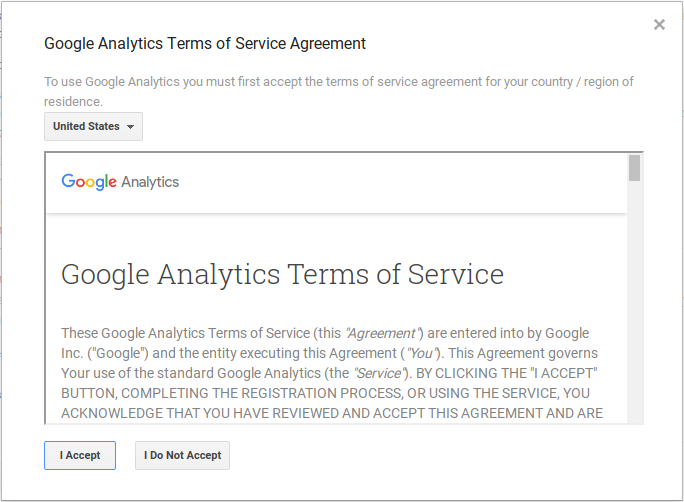
You will be taken to your website tracking code. It looks like this:
![]()
Next you need to copy the tracking code you see in the box.
Then you will need to paste the code snippet into your website’s source files, ideally in between the “head” tags. Your code may look something like this when pasted into this section:
![]()
Where and How do I add Google Analytics Tracking Code Snippet?
Steps to finding and editing your source files will vary depending on the type of website platform you use (Ie: WordPress, Hubspot, Joomla, Drupal, etc).
Google offers guidance for a list of different scenarios, just go here and then scroll down to the section titled “Choose how to set up tracking”. You should be able to find your site platform here with instructions for installing your tracking code snippet.
Once you’ve pasted your tracking code snippet into the “head” section of your website you can check back on the page where you received your tracking code in Google Analytics to make sure Google is receiving data from your site.
Right after pasting your tracking code this is typically what you see:
![]()
Note that it will take some time for this status to update, sometimes only minutes. Try checking back in a few hours or the next day. This is the status you will be checking for:
![]()
Ok, you did it. Google Analytics is now set up for your site.
There are tons more you can and will do with Google Analytics now that you are tracking your website and traffic data. We recommend starting with the following.
Optimize Google Analytics Settings to Filter Bot Traffic
Nearly half of all internet traffic is not humans, it consists of bots. Unfortunately, this traffic gets reported in your Google Analytics data by default when it actually pollutes your data.
You only want to analyze data from your human traffic to help you make decisions to improve your site. The good news is, you can fix this issue in Google Analytics by adjusting settings to filter out bot traffic.
- Go into your Admin settings
- Under the View Panel click on “View Settings”
- At the bottom you will see a heading that reads “Bot Filtering”
- Check the checkbox that reads, Exclude all hits from known bots and spiders
Good job, now most of the bot traffic to your site will be filtered out leaving you with much more accurate data for optimizing your website.
Important! You should also take 5 minutes to setup Google Webmaster Tools after you’re done installing Google Analytics. This process is actually even quicker and just as important!
Get Familiar With the Reports
Start getting familiar with your dashboard and checking out some of the audience, acquisition and behavior reports – they are full of useful data to improve your website’s visibility, traffic, and conversion rate.
If you don’t have time to set up and analyze Google Analytics regularly then you should find a marketing provider who can do this for you.
Alternatively, keep reading to learn how to have an employee or provider do this for you.
In the next section, we will show you how to “add users to Google Analytics” who can review your website performance data for you.
Also, check back here soon for more Google Analytics tutorials that will show you how to maximize your use of Google Analytics data.
Have questions about setting up Google Analytics on your website? Ask them in the comments below.
Leadsurance can set everything up for you and integrates our platform with Google Analytics to offer more accessible simplified reporting for insurance agents right within your Leadsurance dashboard. We also integrate with Google Webmaster tools so you can analyze all of your important website data in one place. Our reporting APIs provide social media analytics as well.
6.) Add Users to Google Analytics Who Can Analyze the Data
If you don’t have time to review your Google Analytics data to improve your SEO then make sure to find someone who can do this for you.
Using their email address, you can add them as a user to your Google Analytics account and give them “view only” access to help you review your data.
Follow the steps below to add users to Google Analytics. If you haven’t already done so, then you will need to setup Google Analytics first.
If you don’t have time to follow the guide now, then you can take this free PDF version with you 🙂
Sign In to Google Analytics & Select Admin
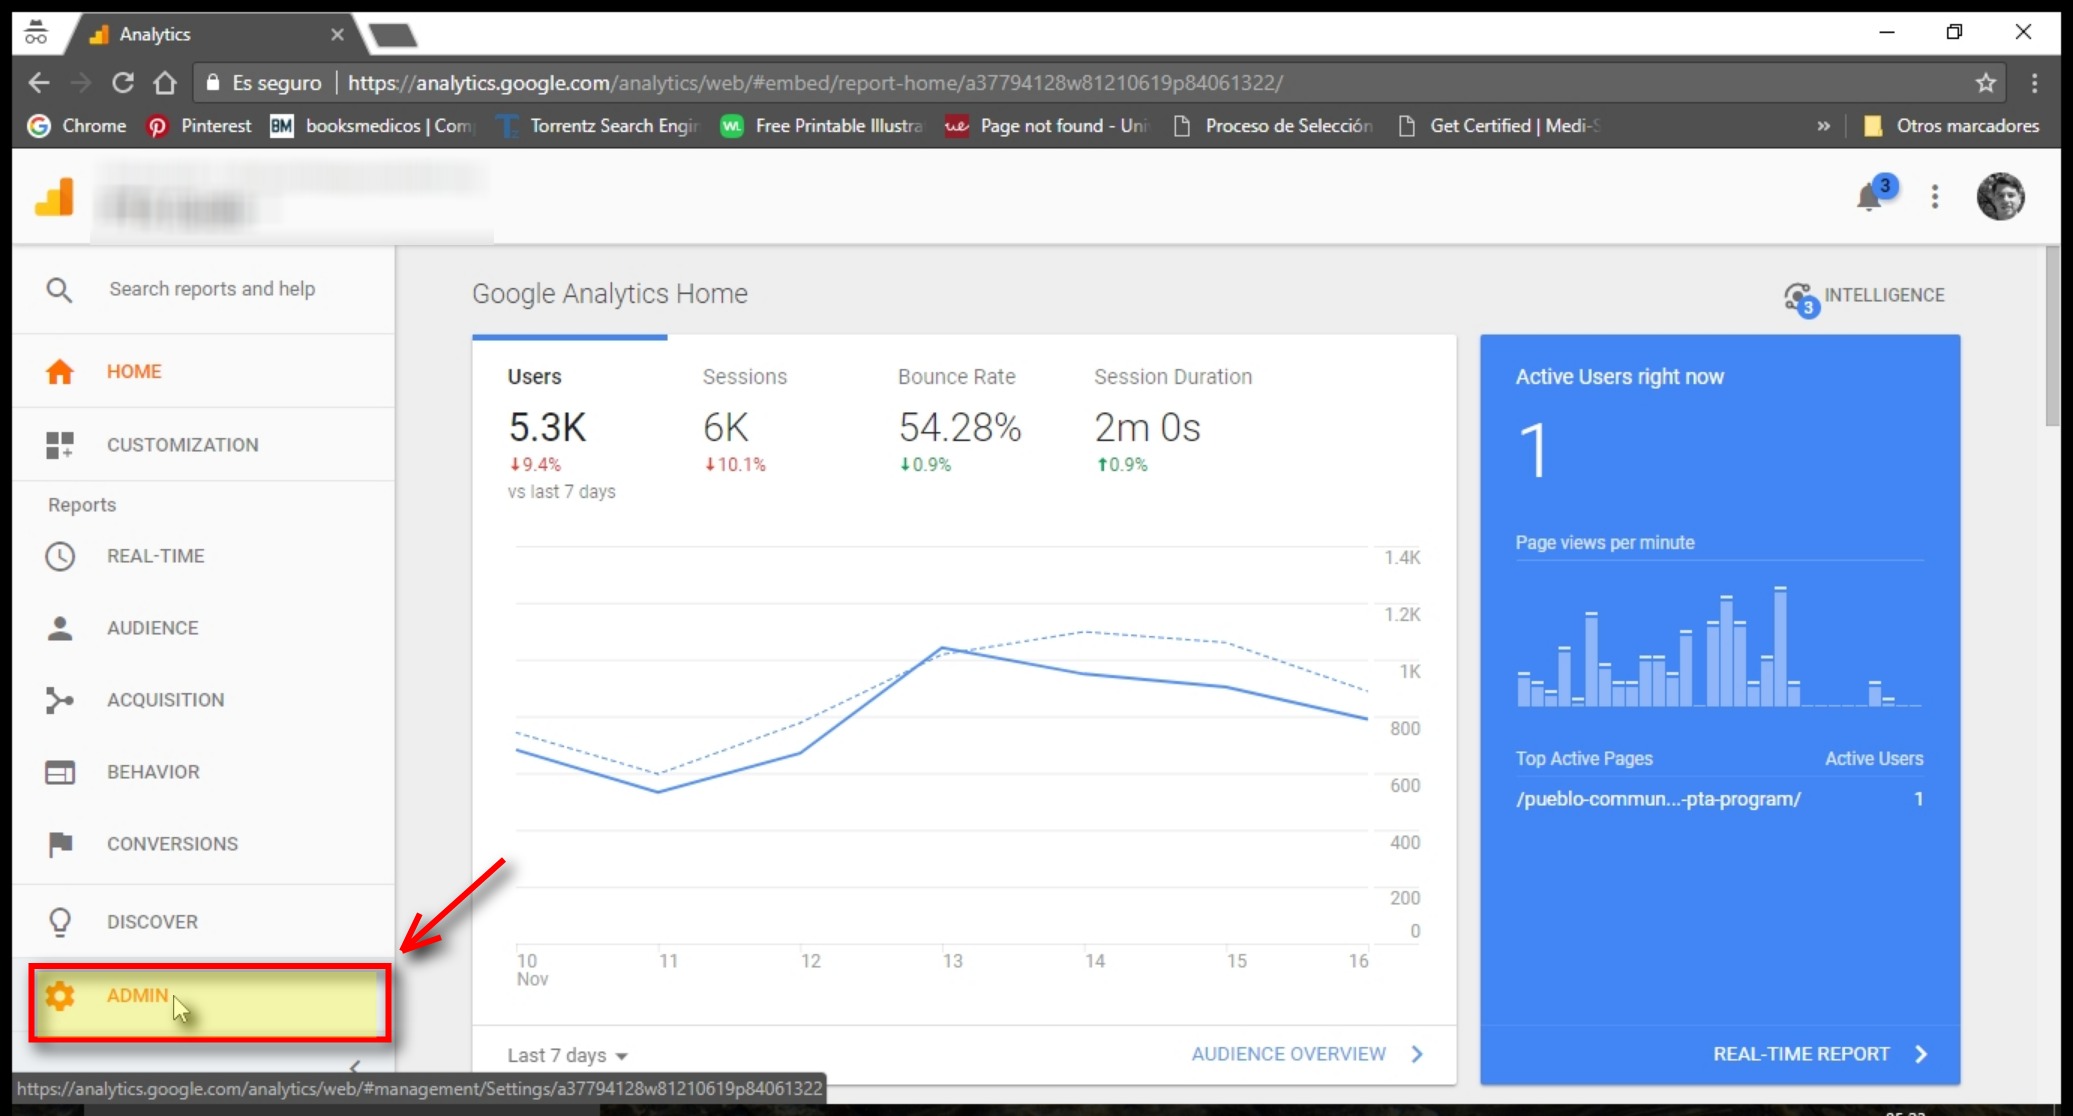
Select Account, Property, View
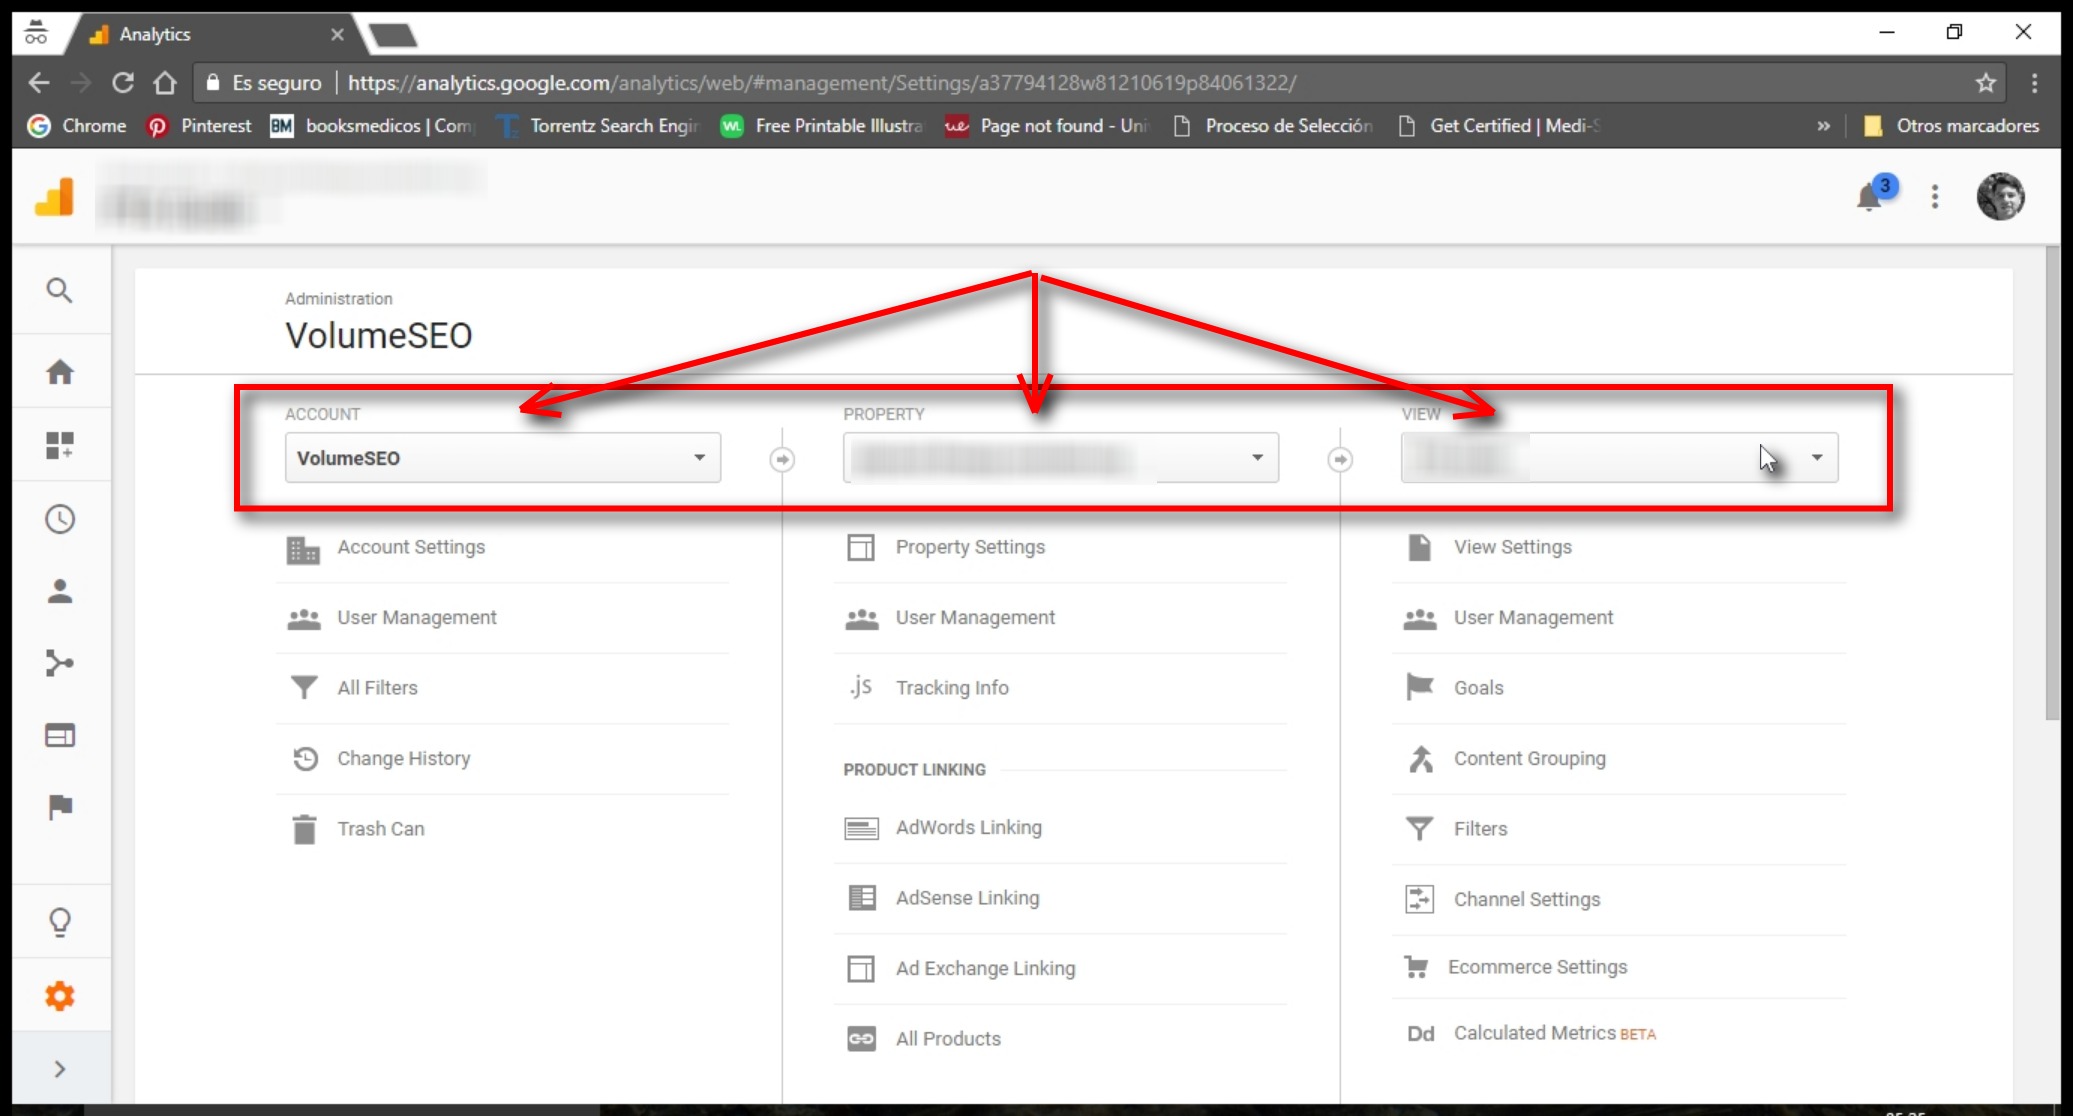
Navigate to the desired account/property/view.
Click User Management
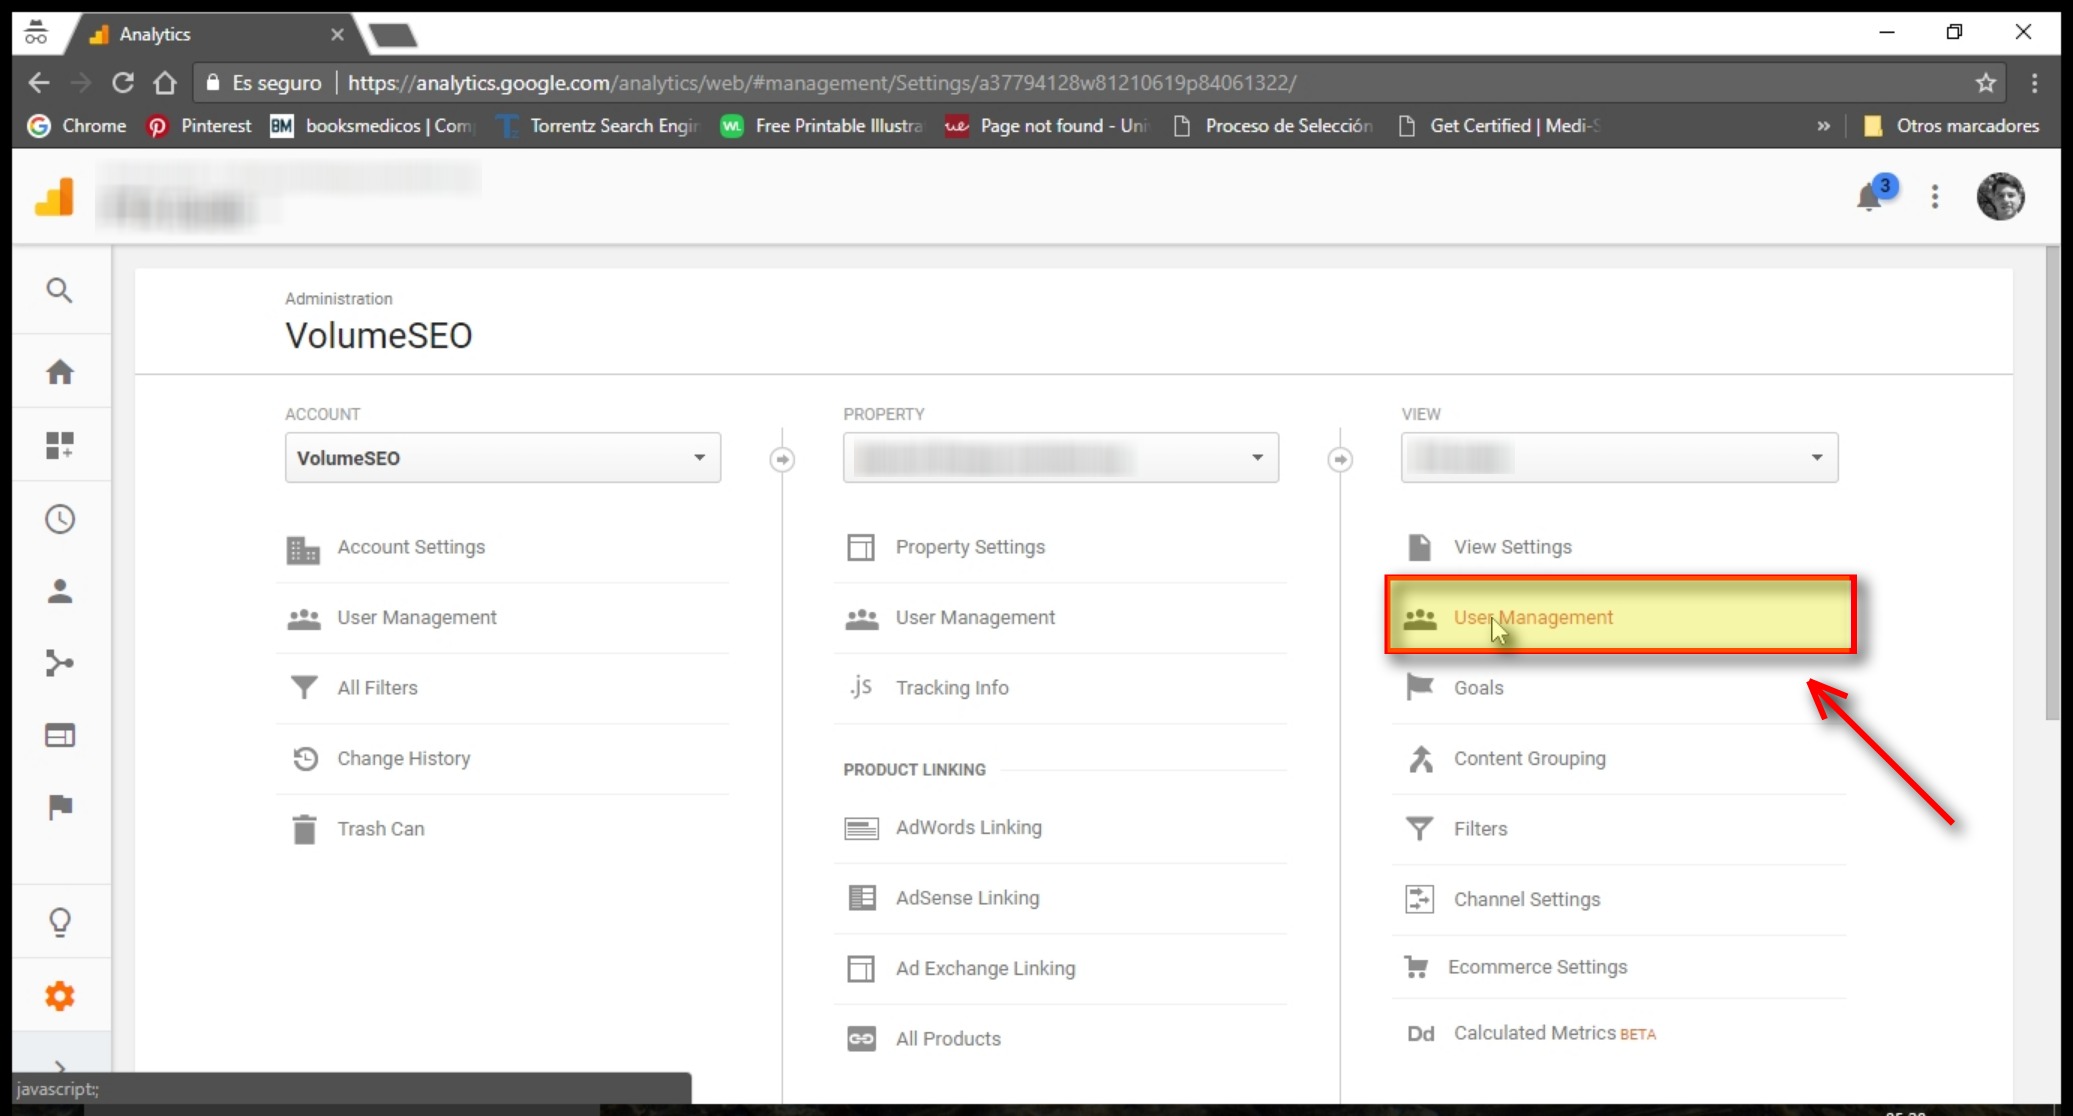
Click User Management underneath the Account, Property, or View that you want to give the user access too.
In this example, we will select a view so that the user we add cannot see analytics data for other domains within this account.
Enter Gmail Address
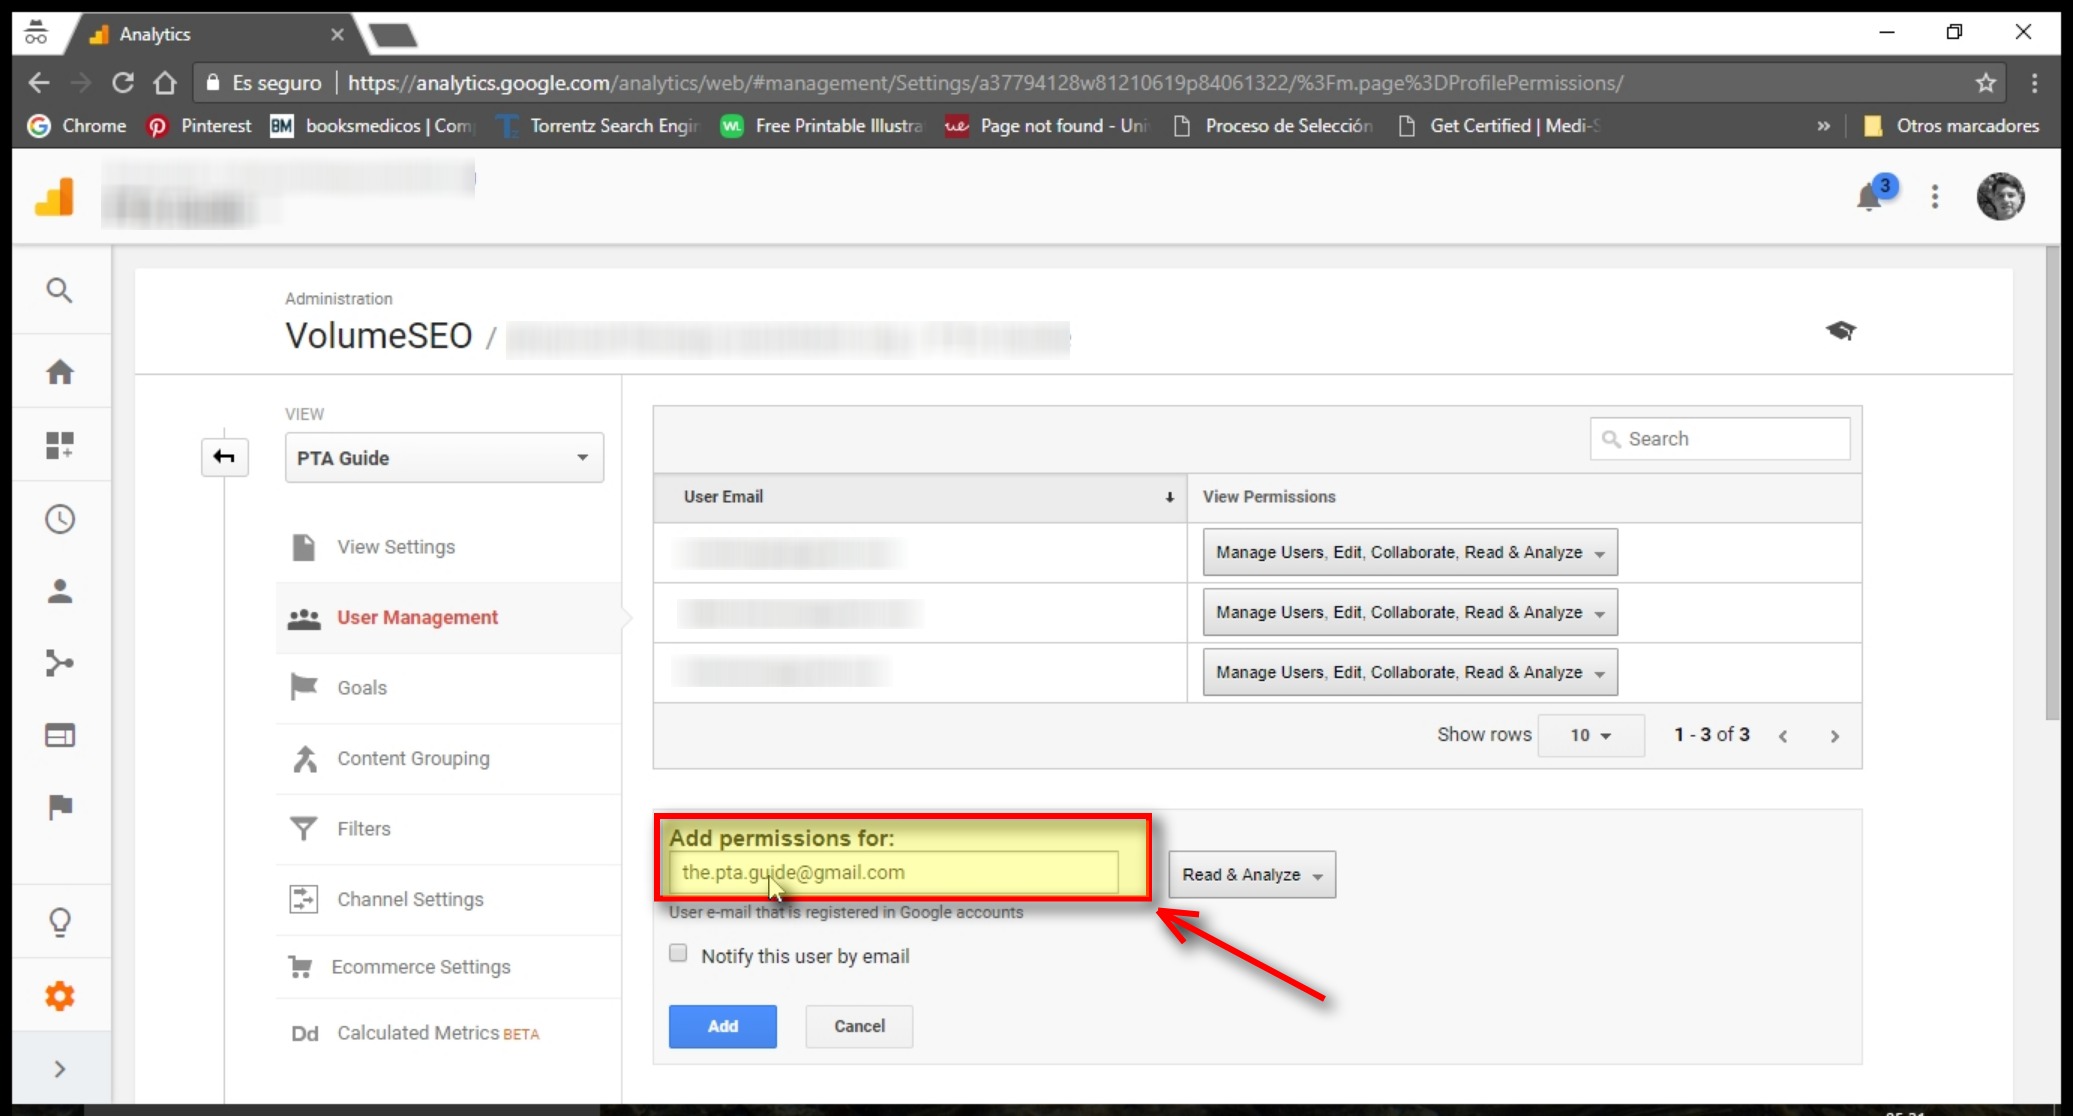
Under Add permissions for, enter the email address for the user’s Google Account.
Select User Permissions
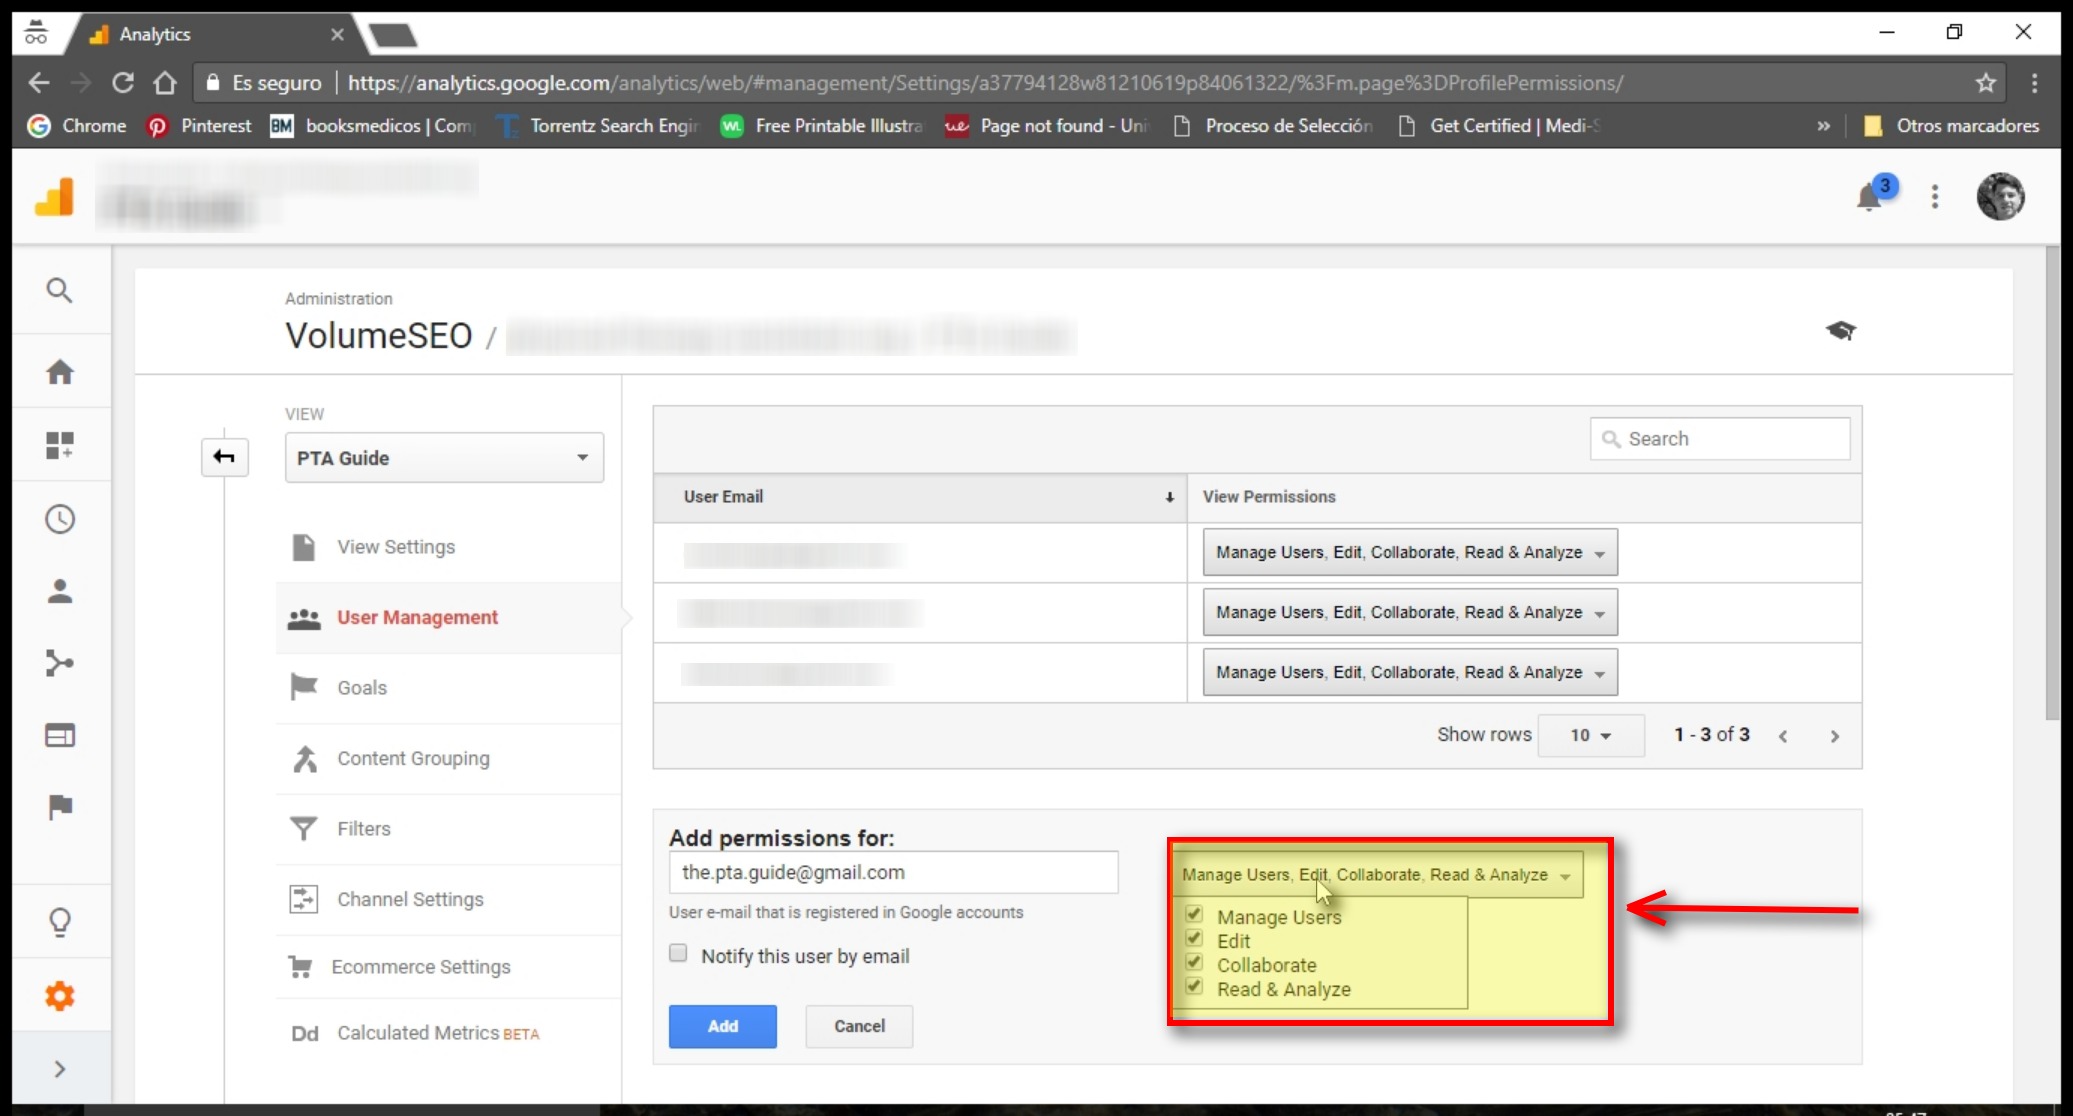
For Leadsurance clients please select all check-boxes granting us full permissions.
For others using this guide, select the appropriate permissions that the user will need access too.
Notify & Add User
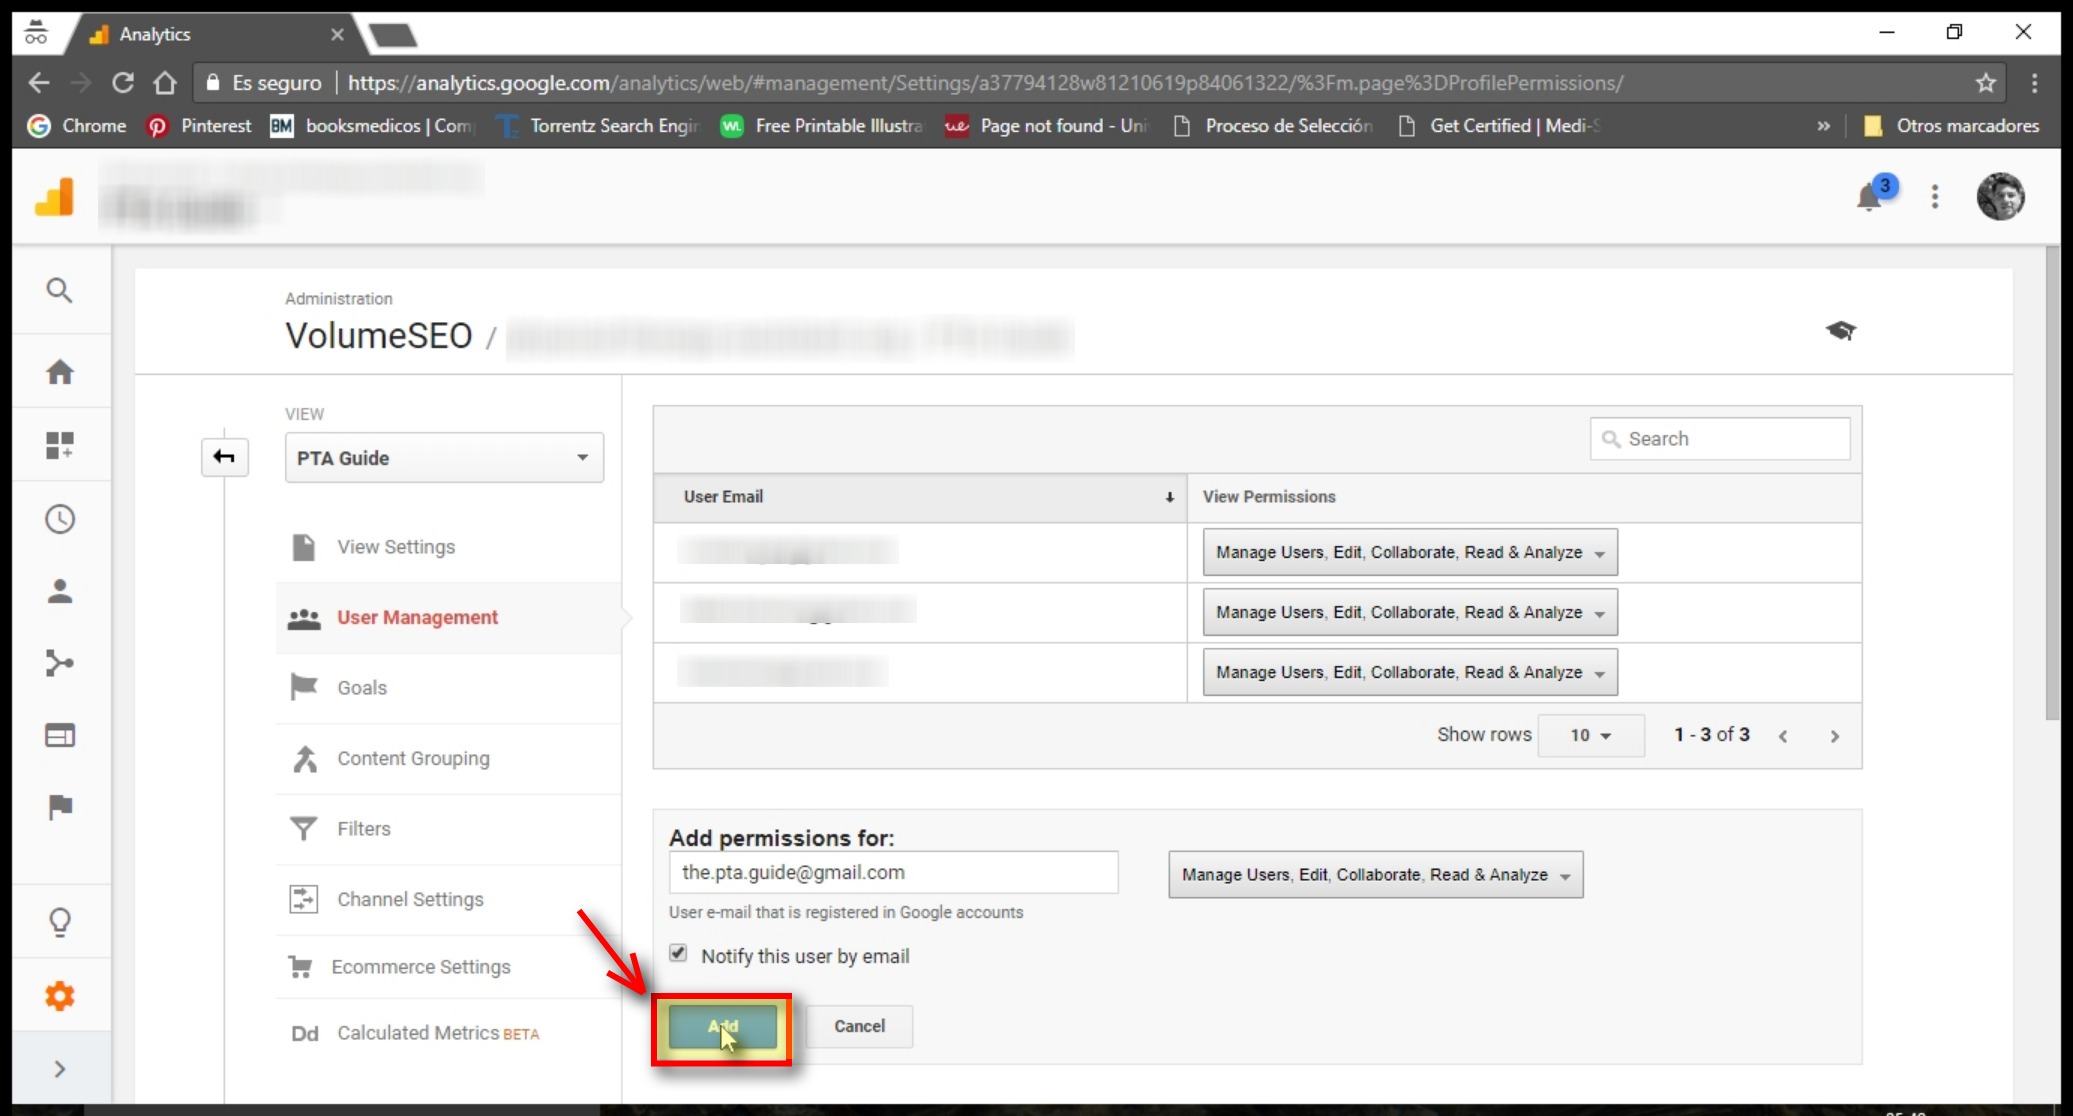
- Select Notify this user by email to send a notification to each user you’re adding.
- Click Add.
Now Go Add Users to Google Analytics
Well, that’s all folks. A few quick steps and you can add a user to Google Analytics in no time.
If you haven’t already, then don’t forget to get Google Analytics setup for your website. You should also take time to setup Google Search Console for even more helpful optimization data.
So, if you are a Leadsurance client, then thank you for taking a moment to add our team to your Google Analytics account so that we can better serve you. Just shoot Keller, or your account manager, an email if you have any questions.
And of course, clients can always chat with us here on the site or in our help center.
For everyone else, if you have any questions, just drop us a comment below – we answer every single comment! 🙂
Now that we have Google Analytics setup and our users added let’s get Google Webmaster Tools setup.
7.) Setup Google Webmaster Tools
 If you expect any SEO results, then you’d better have Google Webmaster Tools setup so that you can get important webmaster data from Google regarding your website.
This step by step tutorial will help you get Google Webmaster Tools set up in 5 minutes.
Ready? Let’s go!
If you are logged into your Google account (don’t have one? Keep reading), then go to https://www.google.com/webmasters/tools/ and you will see the following:
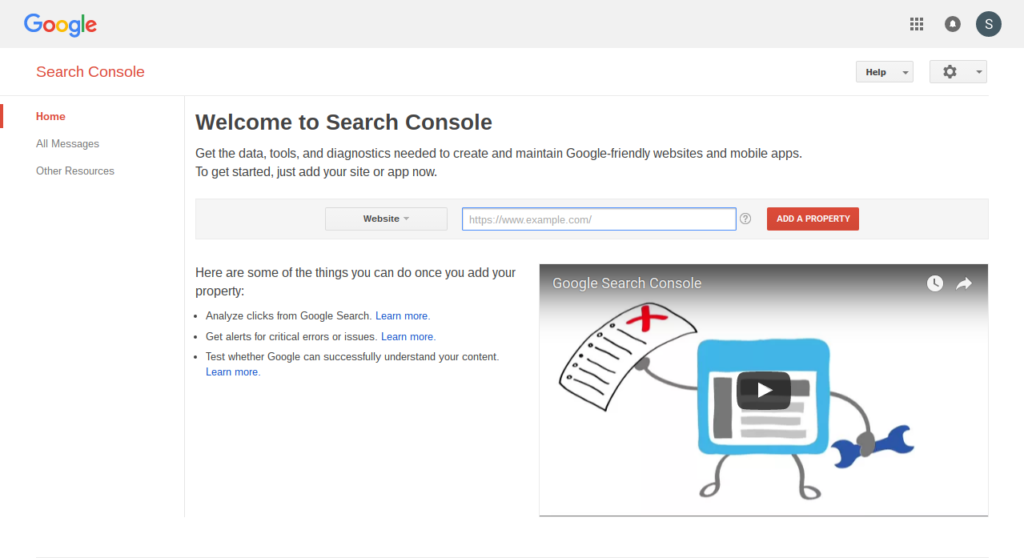
Once at this screen, click here to jump to the next step. Otherwise, continue reading to see steps for creating your Google account.
If you need to create a Google account then go to https://www.google.com/webmasters/ in your browser. Click on “Search Console” and then click “Create Account”.
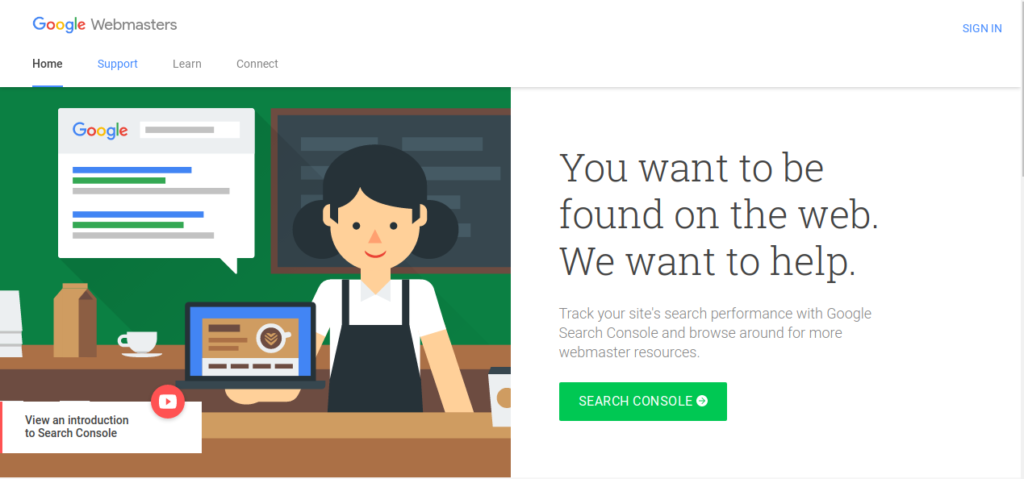
You will be prompted to fill out this form:
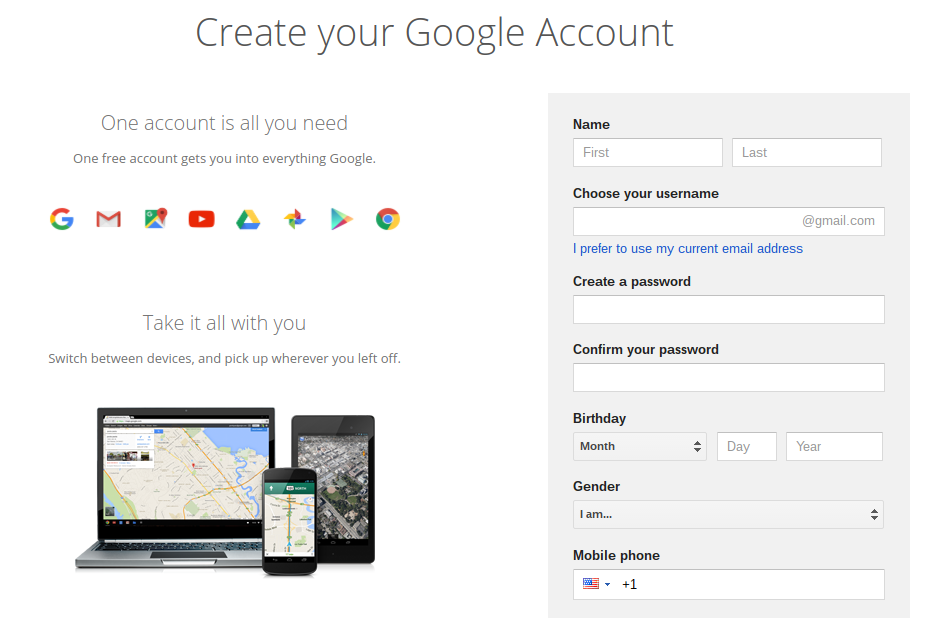
If you were already logged into Google, or once you are done signing up, then you will be on the same page with us here:

Enter your website URL and click on “Add a Property”.
Now you need to verify your website, this can be done a number of ways. The quickest and easiest is to verify using your “Google Analytics” account. Note that you must be an administrator on your Google Analytics account in order to go this route.
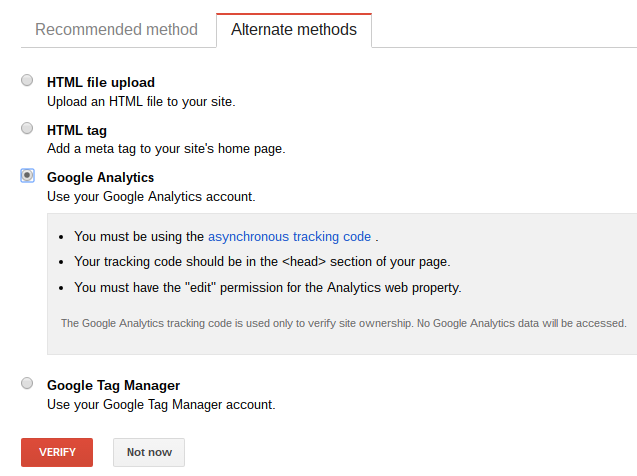
Select Google Analytics and then click on “Verify”.
Once you have verified your site, your Google Webmaster Tools are all set up. It will take Google a few days to crawl your site and the web to collect data for your dashboard, so don’t expect to see anything right away.
8.) Submit a Sitemap to Google Search Console
The first thing you want to do once your site is set up in WMT is to add a sitemap. This will help Google crawl your site regularly for updates.
There are a couple great WordPress plugins that you can use to auto-generate a sitemap such as Google “XML Sitemaps”.
Once you have created your sitemap, it will be located on your website, most often at: www.yourwebsite.com/sitemap.xml
Within Google Webmaster Tools you will see an option to “submit sitemap” by entering in the URL to your sitemap and clicking submit.
You should receive a success message, otherwise, you may have incorrectly entered in the URL.
Alright, once your sitemap is submitted, you’ve got Google Webmaster Tools setup for your website. Nice job!
Now you’ll receive important notifications from Google like if you receive a manual action, your site goes down, pages are blocking robot crawlers, as well as mobile optimization suggestions and a few more.
You can also use data from Google Webmaster Tools for tons of your SEO tasks which we will be sharing throughout our blog.
So, for example, if you heard about Penguin 4.0 or have a manual action and are concerned you may have some toxic links pointing to your site then Google Webmaster Tools can help you identify and resolve this issue. Stay tuned for our step by step guide on how to review your link profile and disavow toxic links.
Have questions about setting up Google Webmaster Tools? Ask them in the comments below!
9.) Perform On-Page SEO Audits
It can be hard to keep up with the SEO industry.
There are periodic changes to Google’s algorithm which impact the effectiveness of various SEO techniques, creating an ever-changing environment in the SEO space.
It seems like every day there are new link building methods, new schema data types to markup, or new social channels impacting search results.
That said, auditing your website for on-page SEO opportunities is always going to be the most important SEO task.
It is one you will need to continually do over time as you update your site and as Google updates their algorithm.
If you are not a Leadsurance client and would like to audit your site yourself, the good news is there are tools that can help you.
Leadsurance clients shouldn’t be concerned with using these tools considering that we perform SEO audits of your website for you.
For everyone else, here are some helpful SEO audit tools that cost around $99 per month:
- Screaming Frog – Great website crawler that will help you audit your SEO factors. A bit technical to use.
- Moz – Offers a website crawler that is much easier to use but not near as flexible or effective as Screaming Frog. Better for SEO beginners.
- SEMRush – Similar to Moz, this crawler is much easier for beginners to use than Screaming Frog but it won’t offer as many insights.
Some of these tools offer free trials from time to time but to get the most out of them you will need to pay for a subscription.
Note: As you can see, paying $99 per month for just one of these tools is going to be expensive. Our clients save on this expense because they get the benefit of done-for-you SEO audits included in all of our packages.
These following tips will discuss the on-page SEO factors you should optimize using the above tools.
10.) Optimize Page and Meta Titles
Include your keywords in both the H1 Page Title + the Page’s Meta Title and make them enticing for searchers to click
Meta Titles are a piece of MetaData for search engines to read. They use them in search result snippets to display a link to users.
So they are important for two reasons.
- First off they need to include your keywords and brand name; they will help you rank better for these terms.
- Secondly they need to be enticing for users to click and thus should appear to answer their search query.
Reviewing your web pages to ensure they meet these two guidelines will help your rankings and increase click-through rates (CTR) on your search snippets.
Once the Meta Title is optimal, you want to also optimize the Page Title.
The Page Title is an H1 Header that is coded as the Page’s Title and appears on the actual content page after the user clicks through the search result.
This title doesn’t need to be enticing to click. It should be easy to read and clearly label the topic of the page.
It is important to optimize both of these titles and make sure they are not identical. Google clearly states that they value web pages with unique Page and Meta Titles that are both optimized.
11. Optimize Meta Descriptions
Include your main keyword(s) in your Meta Descriptions
Like Meta Titles, Meta Descriptions are a piece of Meta Data that search engines use to display in search results.
They appear just below the Meta Title that I just discussed, and for the same two reasons need to be optimized.
Follow the same two guidelines of including your targeted keywords and enticing users to want to click through to your website.
It is important to keep your meta descriptions around 160 characters because anything longer will become truncated in search results and simply replaced with 3 dots like so “…”
12. Use Page Headers
Break up your content with H1-H3 tags which contain your target keywords
Page headers are not just visible to search engines, these are the visible H1 – H6 tags or “Headers” within the body of your content on your web pages.
Your pages headers should include your keywords where applicable, and for local SEO should include your city name where applicable.
Reviewing these for opportunities to add your keywords, where it still reads well to users and makes sense, can help boost your rankings.
Do not over optimize page headers so that you have multiple headers on the same page all using your main keyword.
This doesn’t read well for users and Google bots will view this as spam and devalue the page, thus ranking it lower in results.
It is better to use your target keyword in the headers only where it makes sense and will flow when read by users.
13. Audit Internal Links
Link Internal Related Webpages Together Using Your Target Keywords
Links are extremely important in SEO, they help Google crawl the web and also attribute authority to web pages.
This is called Page Rank and in turn, greatly affects the rankings of a webpage.
It is important to link your web pages properly so that users and search engines can find all of your content and easily access it.
It will also help to properly attribute your Page Rank and signal to Google which pages are the most important on your website, and thus should rank the best.
This consists of offering a clear primary navigational menu linking to all of your major landing pages including things such as product/service pages, a blog, contact page, and perhaps some sales/promotional pages.
It is also very important to link related web pages on your site together.
Do this by including links within the content body that are helpful to users, by offering additional information on some other related webpage.
Remember to make your internal links descriptive with keywords in the anchor text linking your pages together.
14. Business Citations, NAP, and Reviews
Now that you have optimized your webpages for local search and other targeted keywords, it is time to create business listings on local search, directory, and review sites.
There are over 100 opportunities for building local citations, but here are the most important:
Creating and optimizing profiles (creating citations) serves two purposes;
- More online visibility. Getting listed in these local search directories makes you more visible to customers who prefer these to Google search when looking for your products or services. Active profiles on these sites send positive ranking signals.
- More visibility in Google Search. Google collects data from all of these websites, as it finds more of your business’ listings around the web, it will attribute more authority to your brand and website thus increasing your website’s local search rankings.
This means that the more accurate business citations you have around the web, the better your Google Places profile will rank in Google Map Pack results.
Here are some of the most important guidelines to remember when creating or optimizing Business Citations to improve your local search visibility:
- Google My Business: Claiming your GMB listing is the #1 factor for local search.
- Review Signals: Volume and quality of your online business reviews.
- # of Business Citations: Although certain citations are worth more than others, volume does count.
- NAP Consistency: It is crucial that your NAP (Name Address Phone #) is consistent online. This shows Google you are a current business updating their information.
To find the most optimal sources for business citations, you can pay for tools such as Yext or MozLocal. Alternatively, you can hire an SEO company for help, or just join the Leadsurance Family
Next up we are going to talk about linkbuilding to grow your authority. There are lots of do’s and don’ts that Google updates from time to time. So, we will share what is most efficient and effective as well as what NOT to do.
15. Earning Authoritative Links
Anyone who says links don’t matter for SEO anymore, is wrong.
In fact, links are still one of the primary ranking factors making them extremely important to any successful SEO campaign.
Backlinks are absolutely essential to your SEO campaign, whether it is local or national. Links are like votes, they send a signal to Google that your website is a trusted authority.
Google analyzes all links on the web and creates a profile of “backlinks” for each website. The more links Google finds pointing to your website is sort of like Google finding more people voting for your website to rank higher in search engine results.
That said, the quantity of links is not necessarily as important as the quality of the links. You want to be sure to be getting relevant links from quality websites that relate to your niche market.
Random spammy links can actually get you penalized and hurt your search engine rankings.
It is also important to note that anchor text is important when creating links. You want to be using your keywords and your location, if working on Local SEO, in your anchor text.
What is anchor text? Anchor text is the linked text.
Anchor Text Example
Leadsurance is an insurance marketing automation company serving independent insurance agencies.
In this example, the anchor text is “insurance marketing automation company”
By using your keywords and location in the anchor text, this signals to Google what keywords your site should be ranking for.
However, using keyword rich anchor text for every link to your site will get you a penalty. So, a good rule of thumb is to vary your anchor text 80/20, where 80% are branded and 20% use your keywords.
More on that in a minute.
Link Building Strategies
I don’t typically recommend for independent insurance agents and agencies to spend too much of their precious time on linkbuilding.
It requires a lot of time, interest, and expertise – plus good link data and tools are expensive!
Most Insurance Agents/Agencies are much better off paying a professional once they have the budget.
My general advice for DIY agents is to make sure you’ve set up all your important branded profiles online such as social media, major business citations like Yelp/GMB, and to blog comment from time to time on relevant insurance articles.
With that being said, before I share these time-consuming strategies let me quickly plug our affordable linkbuilding services that are included with most of our packages and can be requested a la carte.
Our linkbuilding plans will include:
- Online business directory citations (GMB, Yelp, etc)
- Editorial links in relevant professionally published articles on authority websites
- Media citations from major press outlets (Fox, CNN, etc)
- Social profile links
- Engaging blog comments in your niche
Now if you’d prefer to acquire links yourself, here are some of the most efficient and effective link building methods for insurance agents:
Competitor Links: Anytime you notice a website linking to one of your competitors, ask yourself “how did they earn this link?” and figure out a way you can get a link to your site too.
In some cases, you can simply create a profile on the site and submit your link. In other cases, your competition is paying the site for placement or providing content for the site’s audience that contains a link.
Link with businesses/partners: You can obtain backlinks from other business websites within your niche. You, however, need to contact the business owners or administrators to ask for their permission to link their websites with yours.
This could be business vendors, suppliers, local organization sponsors, etc. Creating a partner page linking your business with their business is a worthwhile decision to make. If you decide to do this be sure to avoid just listing links and make an effort to present your audience with only helpful and resourceful information.
Guest Blogging: Although this shouldn’t be done at scale solely for link building, this is still a good method to gain general exposure to your brand while earning links.
All you need to do is create quality and informative content, which is to be posted in guest blogs. The blogs should be within the same industry (niche) as your business and need to target audiences for creating a customer base. Most of these guest blogs will have a link back to your business website, which can be shared on social sites through your author bio.
Relevant Resources pages: Finding websites in your niche that offer a “resources page” are a great link opportunity. You can then reach out to these webmasters and suggest a link to your website as a resource.
Just make sure you have some information that would be resourceful for their users and provide a link to it. If the website you found is in your niche then having relevant information should not be an issue.
To find some websites with relevant resource pages, use these search operators in Google:
- keyword inurl:resources
- keyword intitle:resources
Link building cannot be done in one day, as it takes time to find high-quality PR links to link back to your business website.
But you also do not want to build links too fast because this can send a negative signal to Google and cause your site to get penalized.
So, attempting to purchase “quick delivery” or “bulk order” links from third-party vendors may attract penalties because most of these links are spammy or low quality.
Any spammy links pointing to your website can cause a Google penalty.
Penalties drastically reduce your organic traffic and sometimes completely eliminate it. In addition to avoiding spammy links, also remember to deviate from using the same anchor text on all of your links as this is also unhealthy for your website.
The safest anchor text when in doubt is simply “Your Brand Name” or “www.yourwebsite.com” and of course sometimes you should use your target keywords but not as often.
16.) Periodic SEO Reviews of Your Site
It is critical to periodically audit your website for technical issues as well as the primary SEO factors that you are optimizing.
Make it a habit to optimize your site and also to track your changes and progress in Google Analytics and Webmaster tools.
Analyzing your website’s performance with these tools will let you know if your efforts are working or not and guide your decision making when optimizing pages.
It is also good to analyze your competitors’ websites that you can see are ranking well in Google.
If you notice optimizations on their sites then you may want to make similar optimizations to your site.
Keeping an eye on competitors is a great way to keep your own site up to date and optimized for SEO.
DIY SEO for Insurance Agents
I just gave you a clear outline of 16 steps to SEO for insurance agents that is proven to work.
Now you can Do-It-Yourself when it comes time to implement your SEO strategy. That said, now would be the best time to start!
You should be migrating your site to a premium web host and purchasing an SSL certification by now.
Or you could learn some hiring tips and hire us to take care of all of this and a whole lot more for you.
Saving you a bunch of time and money on your SEO and lead generation efforts.
Either way, the time to do something is now. So, don’t wait any longer, let’s start.
Ask me anything you want about SEO for insurance agencies below and I’ll do my best to help you.
